Showing posts with label shabby chic. Show all posts

Tuesday, 14 January 2014

Yellow and Pink Chest of Drawers Perfect for a Little Girl's Room


Oh I am so pleased to share with you my first custom order of 2014. The lovely Kate had seen a few of my pieces that I've put up on my Facebook page and wanted something for her little girl's room. She already had a yellow bookshelf so she was after something that would go, but not too matchy matchy. We decided that it would look really cute to have yellow on the outside and pink drawers.

This was the before shot..
.
Before... solid pine but a little rough.

Here's a pic of the drawers painted as we described...
Yellow and pink, bright and fun, but missing something?

I liked the drawers but they didn't 'wow' me IYKWIM. I had wanted to replace the knobs but whoever had made these had glued those suckers in so tightly that it was near impossible. I contacted Kate and told her that I thought it would look cute to decoupage around the drawers, just to give them a little something, so it was off to Spotlight to search for paper. I think I've said this before but Spotlight do have really beautiful scrap booking paper. But if that's your thing, you probably already knew that, right? Here are the 5 options I narrowed it down to, before settling on the top left.


And here's what my son Wil got up to in Spotlight when I turned my back for 5 seconds....


So glad we jazzed it up a bit more, it looks fantastic!


Close up of the paper detail.


And just for a little fun, here's what it would look like if it were a sketch (thanks Nikon camera)

Thanks Kate for asking me to do this for you, hope it's exactly what you hoped for!

Are you interested in a custom piece of furniture? Please feel free to contact me and we can come up with something together to suit your needs perfectly.

Friday, 27 December 2013

Vintage Shabby Chic French Grey Buffet / Chest of Drawers with a Decoupage Top

Oh my it's a busy time of year, isn't it? So busy, in fact, that I finished this piece about 5 weeks ago and am only now getting the chance to photograph and write it up, but that's OK, gives it plenty of time to cure before it goes (hopefully) to it's new home.

I love the vintagey feel of this sideboard / chest of drawers / buffet / entertainment unit- truly this piece could be put in so many places in a home. I currently have it sitting in our pool room and the more I look at it the more I love it. The top is decoupaged with a gorgeous slightly shimmery pattern.

Here's some pics (sorry for the awful background and tiles- Imagine it in your beautiful home instead!

Check it out on my furniture for sale page.

So pretty in grey and white!

Saturday, 23 November 2013

How to Decoupage Tutorial- A Shabby Chic Bookshelf

I wanted to share a proper tutorial on how I learned to decoupage and to share how effective it can look. Here is a book shelf that I completed for my friend Sarah.

 My first step was to stain the pine shelves. Sarah was looking for a browny-grey stain rather than paint because she wanted to be able to see the wood grain. Here's a pic showing what the shelves looked like when half completed:
To decoupage you need to have a good foam roller, some decoupaging glue (I buy mine from Spotlight), a paint brush for getting into corners and some fancy paper (Sarah chose this paper- her partner just loves how masculine it is!)

 Ensure the surface you are applying the paper to is clean and  smooth, then with your foam roller apply a thin layer of the glue to both the surface you are decoupaging and the backside of the paper. My picture doesn't show it as a thin layer, but that's about how much glue I used for the entire 30 x 30 cm area so it does get quite thinly spread.


Next, carefully place the sheet down on the area. You must work quickly for this part and work section by section so the glue doesn't dry in between. The glue dries incredibly quickly! 

 Smooth down the sheet, working out any air bubbles carefully.

 When you have completed the whole area you need to use the foam roller again and roll glue over the whole piece. This will seal it and leave a nice shine. If the surface will be used for something that gets a bit of use (eg a table top) you can spray a layer of poly over the whole piece. I skipped this step as it wasn't necessary for this particular piece.

For more projects and pieces of furniture check out my facebook page www.facebook.com/RetroVintageLove

Sunday, 3 November 2013

Aqua and Coral Queen Anne Coffee Table with Decoupage


*Beware stream-of-conciousness rant* I originally had a vision for this coffee table to be painted blue and left at that, but then I thought the orange trim would look really cute and then I decided a stenciled table top would look gorgeous but I've tried (and failed) to do a nice stencil previously and didn't want to ruin the table... and then I hit Pinterest.

Decoupage! I read a few blogs including this one from Apartment Therapy and decided to give it a shot. If you want to see some of the other decoupage projects I looked at- have a look at my Pinterest collection 'Furniture Inspiration' you can find and follow my stuff here.

The final product- complete with glass top which doesn't make for great photographs!
So after painting the legs and trim I set about working on the decoupage top. First stop was Spotlight where I was very impressed with the range of Scrapbooking paper. Most decoupaging websites said that you had to be careful that the paper you chose was not too thick so I was a little worried, but I found this fine to use. While there I also picked up some glue. Every site I looked at recommended Modge Podge glue but I couldn't find this, so I bought some generic brand of glue labelled 'Decoupage Glue' and figured that would do the trick!

Next I procrastinated, not wanting to make a mistake.

Then, I set to work. I trimmed the scrapbooking sheets so that I would cover the whole table without the joins being too obvious. Then I worked out the order that I would place the sheets down, leaving the middle piece last, so that it would hide any overlap. I covered the whole of the table top with glue using a foam roller, this is to ensure an even consistency. Then I put the paper on, adding a layer of glue to the back of each piece of paper before placing them in position. I found that the glue dried very quickly and there was only a very narrow window of opportunity for re-positioning, so it's best to be sure before you place them down. I repeated this until the entire table was covered then used my hands and the roller to work out any air bubbles. This part of the process is very similar to when you were in school and had to contact your school books. Thanks Mum for the valuable experience! I used a paint brush to apply a top coat of the glue to seal the paper. I did this because I find the coverage more thorough with a paint bush than with a roller, but I'm sure you could use either.

The coffee table came with a glass overlay to protect the top of the table so I popped this back on, however if there were no protective layer I would recommend sealing the project again with a poly so that you can happily wipe down the surface and keep it clean. Unfortunately the glass makes it difficult to photograph and show the true beauty of this piece so I've taken a few photos without the glass on so that you have a better idea of the effect. This is definitely one of those pieces that looks better in real life though!

Without the glass top but still with a little reflection

I do love the look of this one, if I didn't already have an awesome coffee table I would be keeping it for myself!

Want to buy it? Check it out on my sales page.

Like some advice for decoupage or to have a piece of furniture done for your own sweet self? Contact me via my Facebook page- https://www.facebook.com/RetroVintageLove


Monday, 26 August 2013

French country provincial style white and timber coffee table- cute as a button!

French Provincial coffee table, cute, no?
I never intended this coffee table to be a French Provincial style table. I bought it off eBay intending to make a twin of my own coffee table this turquoise and whitewash one which I just love so much.
When I picked up the coffee table though, it was a bit smaller than I had anticipated- my fault, the dimensions were listed and I ignored them due to my very poor spatial awareness skills and lack of any ability to visualise an item when given dimensions! I'm not sure why, but white was just calling out to me for this one. So white it ended up, not blue. Don't be sad, though, just this morning I picked up a Queen Anne style coffee table that I fully intend to paint my favourite aqua colour!

This is a little coffee table, perfect for a two seater sofa or a smaller lounge room. I think it has come up really well. The stained timber top is beautifully smooth and the timber itself has lots of lovely knots.

I thought I might also include a shot of the leg detail- last post my dog was photo-bombing, this time it's the cat's turn!


For those of you who love a before shot, here it is!
Before photo.... and time to cut the grass!
Yes, it is for sale- check it out on my items of sale page, complete with dimensions!
Want more? Sign up to follow the blog via email, or use the Bloglovin' icon- you will love Bloglovin', I promise! Want to help me choose colours, and see sneak peaks of upcoming furniture? Like and share my Facebook page Retro Vintage Love. Want to help me? Tell your friends!

Thursday, 22 August 2013

Vintage Record Player Cabinet Painted Pink!

Last time I wrote I promised that I would do a write up of the other piece of furniture that I picked up from my gorgeous friends' grandparent's home. It was this:

Before photo of this cute vintage cabinet. Yes that is my dog photo-bombing in the background!
A piece with lovely Queen Anne style legs, cute hardware and nice and solid but made in that funny streaky timber. I immediately loved it and wanted it all for myself. I have been on the hunt for somewhere to store our many DVDs without having to have them out in the open for all to see as they used to be. Also, I have a very adorable 7 month old son who is on the cusp of crawling. I could just envision him pulling down the whole tower and having them all fall on his little head! So the towers had to go.

I wanted colour for this piece. As I've mentioned many many times I love furniture painted bright colours. This is quite new for me. When I first started buying my own furniture I always went for the dark wood look, however when we bought our home I realised it was such a dark house with quite small rooms that the furniture was claustrophobic being so dark. That's where my hobby began- painting furniture for my own home to make it look brighter and more open. It has definitely helped- I am much happier in my home now!

But back to this piece... I undercoated the whole thing then mixed my own shade of paint using Dulux Orchid Orange as a base. I actually started painting in the straight colour but as I was looking at it it seemed too dark so I lightened it up with more white. Here is the 'After' photo.


My biggest problem was with the handles. They couldn't come off as they were not screwed on, but rather adheased with glue or something and I was scared I would do irreparable damage to the piece if I tried to get them off. So I tried to cover them off with masking tape and paint around them but due to the intricate nature of them this was just impossible. So I decided to go with the shabby chic look and sort of lightly paint them but do a really shoddy job of it so you could still see the black underneath! They actually look great in real life, but they haven't shown up all that well in photos. Here's a photo anyway...


I love it! It holds all of our DVDs (only just- we are going to have to stop buying new ones) and looks oh so cute with the photos from our wedding, my grandparents' wedding and our little keepsake box which has just the right shade of pink in it too!

Does anyone else have a great piece that hides all their DVDs?

If you like reading about furniture refurbs please like my Facebook page Retro Vintage Love. You can also find me on Pinterest pinning all types of inspiring photos and you can sign up to my blog via email or Bloglovin'. Til next time xx

Monday, 22 July 2013

French Grey Antique Vintage Style Chest of Drawers

A little while ago you might have noticed that I asked the question on my Facebook page (Retro Vintage Love- please 'Like' my page if you like my work!) whether I should paint this little chest a coral colour or grey. It was almost 50-50, but grey just won out.


Luckily for my fellow colour lovers, the coral is coming, I promise!

Here's what the chest of drawers looked like before. As you can see it was pretty poorly. The handles don't look too bad in pictures, but they were actually horrible plastic things, and one was missing, so they had to go, and the exterior was pretty chipped up and rough.
I sanded the whole thing back completely, which was a pretty horrible job due to the age of the varnish, then gave the whole thing a couple of coats of undercoat.
For the colour, I went with a Dulux colour called Moxa which is in the same range as the Ashville that I used to paint these chairs, however it is a bit darker, because I mixed the colour myself with some white enamel paint to make the finish more durable.
Here's a pic of the drawers after....

I bought new handles from Riverclay in Eltham. They have a lovely selection of handles and knobs. For the record, Bunnings do not. These were brass, I lightly sprayed them with black paint, there is still a little of the old brass visible, which I love.
Think you could give it a home? Contact me via Facebook or on my email- retrovintagelovefurniture@gmail.com


Monday, 8 July 2013

Pale Blue and Whitewashed Distressed Coffee Table

My new coffee table. Love!!
I am beyond in love with my new coffee table. It's an old pine number that in its previous life was stained stained stained! I spent HOURS sanding out the thickest, deepest, darkest stain and as I did, this gorgeous timber grain appeared. Here is a (terrible) pic of the table before its makeover.


The coffee table before. I cannot describe how thick this stain was.

This piece of furniture is for our own home, which I love doing because I can paint with COLOUR! When I'm doing pieces for sale I try to be a little mindful of the fact that not everyone loves colour as much as I do, but I really think that once you've got some coloured pieces in your life you'll never want to go back again. Try it and see!
 

I had initially planned the pale blue legs with an oil top, similar to my shabby chic white hall table, but I was just loving the bare timber. Then my brother in law (BIL) mentioned that he had seen some cool white wash furniture whilst he was out and about (he's a very talented sparky) and the seed was planted. If you're following me on Pinterest you'll have noticed that I pinned quite a few white wash pieces on my Furniture Inspiration page. If you're not following me on Pinterest what a great opportunity to check out my boards, lol- search for Retro Vintage Love Furniture and you'll find me!

I painted the base in a pale blue / aqua of my own making and distressed them- I think the distressed look goes perfectly with the whitewash top, even though my husband just doesn't 'get' distressed. He thinks I've missed spots even though I actually spend quite a bit of time planning where I will distress and exactly how much to distress!

I loved trying out the whitewash technique. The effect is very subtle. I used about 1:4 paint to water ratio and was working quickly to brush on/rub off within about 30 seconds for each section. If you're new to painting this would be a great technique to try. I honestly don't think you could stuff it up, it's fast and fun. If you would like to give it a try and have any questions, please just email me or leave a comment! I finished my top with a spray of British Paints Poly top coat. I'm going to give it a week and see if I want to give it another coat too, depending on how much wear I use.


And finally, the finishing touch, I found the CUTEST little knob in a little shop near Eltham train station (this is also where I got the knobs for the little chest on my cover picture). How much do you love this stag?! If you haven't noticed, deer are the new birds. They are suddenly popping up in all the decorating magazines. As are cow skulls, which I am yet to be sold on. I love how the colours on this knob match perfectly with the top of the table.


What coloured furniture do you have (or want) in your home?

Til next time, happy painting!


Sunday, 23 June 2013

Painting Furniture White - The Vintage Dresser

There's no doubt about it, one of the most popular make-overs for old furniture is to paint it white. And it's easy to see why it is so popular- white is fresh but elegant and fits with nearly every decor style, whether that be retro (my personal favourite), shabby chic, French Provincial, vintage, farmhouse, coastal.... you get the idea.

Here's my latest white makeover. It is simply gorgeous. It's amazing how fresh an old piece can look with a fresh coat of paint.

I must admit, I found the prospect of this project quite daunting- but was pleasantly surprised. Even though there's a lot of detail in the woodwork, it sanded reasonably easily due to the age of the piece. And the smooth surface made painting easy too- time consuming due to the size of the piece, but not too challenging.
 
I used my trusty British Paints 4 in 1 Primer and British Paints Enamel White in Semi Gloss (only a tiny amount of shine- just enough to look fresh) 
 
Here are some before and after pics to compare:


I love this dresser for the little details too- in the top drawers of the dresser I found this gorgeous drawer lining paper. Pink paper with flowers and butterflies- you can't get much more shabby chic than that!
And check out the handles- so intricate and detailed, with just the right amount of ageing.
Also, the detail in the legs and bars that hold the mirror just make this piece so special.
Yep, I love it and could go on and on!

Do you have any pieces that you would like to paint white? Please share your own projects!


Wednesday, 5 June 2013

Little Blue Shabby Lamp Table

My Shabby Chic table after some Retro Vintage Love!

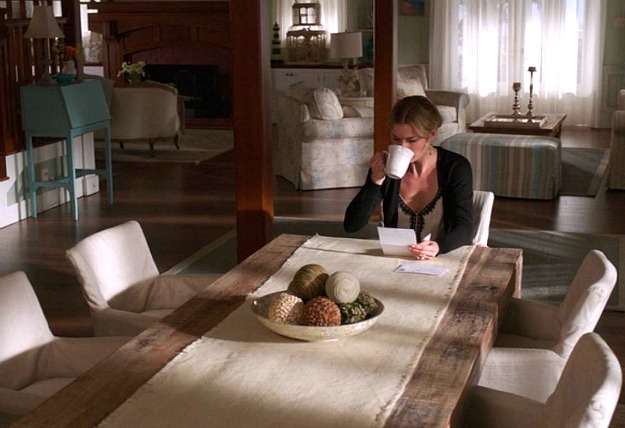
I cannot describe how much I love this little piece. I love the colour- I knew I wanted to do something blue after seeing some similar furniture in Revenge. See the gorgeous blue desk in the background?


Emily's Beach House in Revenge-dining table
Emily's furniture on Revenge. A shabby chic Hamptons dream!

Love it! I must admit, I am constantly distracted when I watch Revenge because I love both Emily and Victoria's furniture. And I'm not alone... read here for a whole Blog dedicated to Emily's house on Revenge. I have the same issue with A Place to Call Home. Gorgeous 1950s furniture everywhere.

Anyway, back to my latest piece. No long post about the process for painting this one as it was a very straight forward piece. The colour? I cheated! Remember my ombre chest of drawers? I had a heap of left over paint, in various shades of aqua which I mixed together to make this lighter colour.

I love this little hall table for it's natural distressed look. The original piece was a little worn down in parts, it had a few cracks and tiny holes which remained even when painted. All I had to do was distress it a little further after the paint had dried.

Love it too? Of course it's for sale! Check out my sales page for the link.
And just for those interested- the before and after shots.
Happy painting!